Materials and Tools Used:
- yarn (I chose to use red because it is what I had on hand!)
- knitting needles (I used the 9 inch Takumi bamboo needle that was 10/6.0 mm)
- bobby pin or yarn needles (For joining the ends of the knit together)
- scissors
- ruler/measuring tape
Due to the weather getting colder, I wanted to try knitting something that can help keep me warm for the winter. I have already tried making scarves in the past, but now I wanted to try making a hat. Most hat tutorials require circular needles, but I only have the standard type of needles. Luckily, I found a tutorial created by a YouTuber (Michelle) whose channel is called The Snugglery. Michelle’s video teaches you how you can use straight knitting needles to create a beanie hat (view her video here). It is a really simple project and it also did not require a complicated stitch, which is great because I have not knit anything for quite a while.
While knitting, I tried following most of the steps, and made some adjustments accordingly. Here is my process:
The goal of this project was to knit a rectangle with dimensions of 9 inches in width and 18 inches in length. Once I was done knitting the rectangle, I joined two ends of the knit so that it can form a tube, and then closed up the top of the tube to create the hat.
To start, I cast on 35 garter stitches (in the photo, I already started knitting rows of stitches).

I chose 35 stitches, which turned out to make the hat about 9.5 inches tall instead of the 11 inches in Michelle’s (The Snugglery’s) instructions. I wanted my hat to have less room on top because I normally wear my beanies half way, and don’t want excess knit weighing the hat down.

While I could have counted the number of rows I knit, I found that using a ruler to keep track of the length was more helpful to me because I was knitting every other day (since I started during my Fall semester). Here, you can see that I was able to knit until the rows passed the 12 inch mark. My goal is to knit so that the knit can reach around 18 inches in length, since it was the recommended dimension that Michelle used in her tutorial.

Once I measured around 18 inches for the length, I cast off my knit from the knitting needles and re-measured. It turned out that casting off can reduce the length of the knit, and my hat length (or circumference) turned out to be a little less than 18 inches. It was fine by me, because I prefer hats with slightly snug fits.

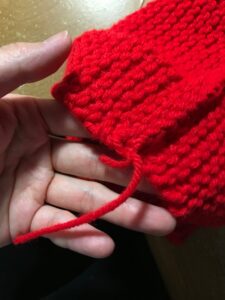
When joining the two ends together, I cut a string of yarn that was about two times my arm span in length (maybe about 5′) and threaded it through a bobby pin, which acted as my yarn needle and used it to help me make a knot at the base of one of the two sides. Then, I used the mattress stitch (that Michelle suggested in her tutorial) to join the two ends together.

After I joined the two ends of the hat together (see left), I had some excess yarn, which I can use to help me close the top of the “tube” and form my hat.

To close the tube up, I just used the bobby pin to weave in and out through the stitches on the top edge of the tube and pulled it tighter to increase tension in the yarn and gather it so that it bunches up, and closes up the tube. While doing this part of the project, I realized that I could have cut a longer string of yarn because I had a hard time trying to gather the tube together with the remaining length of yarn I had after I used most of it to join the hat’s two ends to each other.

I did what I could, and pulled the yarn as tightly as possible so that it could bunch the hat up (see below). And I threaded the little excess yarn I had through the middle of the bunched up knit tube and tied a large knot to secure the gathered form of the tube.

This was my final product! It turned out pretty well, and the process to make it was so simple!
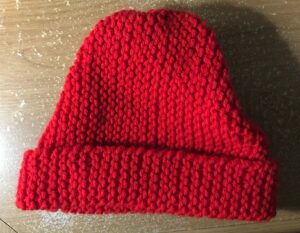
This is what my hat looks like while I am wearing it!

I will definitely try doing this project again! And in the future, I might use a different stitch (from the garter stitch) to create a hat that has a different pattern and texture.
UPDATE!
I am back on this post with an update! I have tried doing this hat project using the stocking stitch. From looking at the picture below, you can see a clear difference in the appearance of the stitches (from the garter stitch). The difference is due to the fact that the stocking stitch is made using a “knit 1, purl 1” method, where you alternate knit and purl stitches along the same row of your needle.
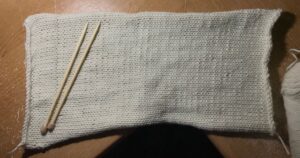
Once the piece reached an appropriate length, I followed the same process I used for my first hat:
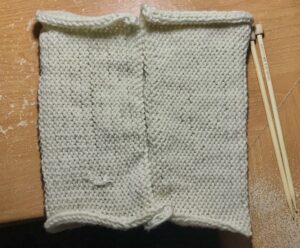


One issue that I encountered with this particular hat was that the edges of the hat brim ended curling into itself. After searching the internet for the reason why, I found that the curling was due to the nature of the stocking stitch, since the knit and purl stitches slightly differ in size. After making this hat, I determined that this would not be the most ideal stitch to use for hats, and that if I did want to use this stitch again, I should use preventative measures for the curling (i.e. adding edges that use different stitches).

This entry is licensed under a Creative Commons Attribution-NonCommercial-NoDerivatives 4.0 International license.